Unity 3D Essential Training Tutorials Part 1
For the beginning of the tutorial its an introduction and for the first section it talks about how to set up the Unity Project.
*I created a folder structure in Unity*
*Imported Standard Packages to my folders*
For Section 2, Understanding the Unity Project, I will be working on the following:
**Noting being done in this section**The Ones that are empty do not have any work being done.*
Intro to the Unity user interface:
Customizing the UI:
Navigating Unity*: For this part I am using the Game Object Tab to create multiple objects in the view port and there is also a way to isolate objects just by searching a specific one in the Hierarchy search bar ( There is also one in the view port ).
Unity Documentation:
For Section 3, Working with Assets, I will be working on the following:
Game Objects and asset creation: For this part of the tutorial it is show me how I can create my own Game Object and adding components in that one Game Object.
To start off all I do is go to the Game Object Tab and add Empty. Then from there I will be able to add components in the Inspector Tab.
 It also shows how I can add or delete components from existing Game Objects.
The Unity Asset Store: *Just a quick overview of the Asset Store in Unity*
Content creation checklist: another overview that talks about what things I should keep in mind when I create a Unity Project.
- Poly Budget
- Snapped to origin * have stuff snapped to 0,0 in Unity so they are on Unity properly.
- Proper UV's for two channels: Textures and Lightmaps
- Textures are (should be) power of 2 (512, 1,024, 2,048)
- Proper Directories: Unity Structure
- Animation: Light, Clean, and Easy to Export
- File Format: Use .fbx
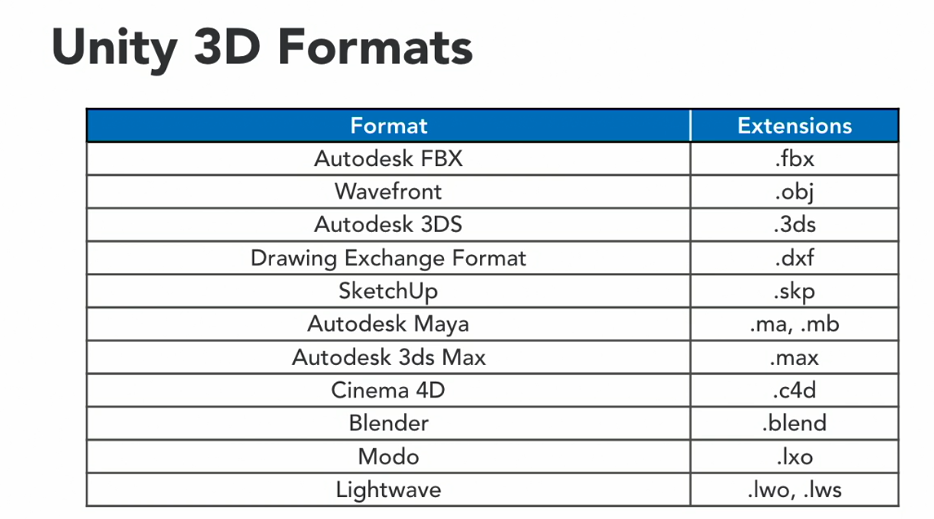
Exporting assets for Unity:
For the first part of the video it just explains the different types of formats Unity can use.
 After this part it shows how to export assets or a whole scene into Unity.
Importing assets into Unity: For this part I am importing assets into unity by right clicking and selecting Import New Asset . From here I am only importing assets that I will be needing.
For Section 4, Applying Materials, I will be working on the following:
Intro to materials: For this part It is talking about the materials (overview) that have been given to us and what they are/ do.
 Creating and organizing new materials: This part only goes over how to create a simple material and what type of shader It can turn to.

Material and texture properties:
For the first part of the video I am changing the color on the material I made (Picture Above). Also I changed the Shader to Standard (Specular Setup).
 From here I can adjust the color of the material to however I want it.
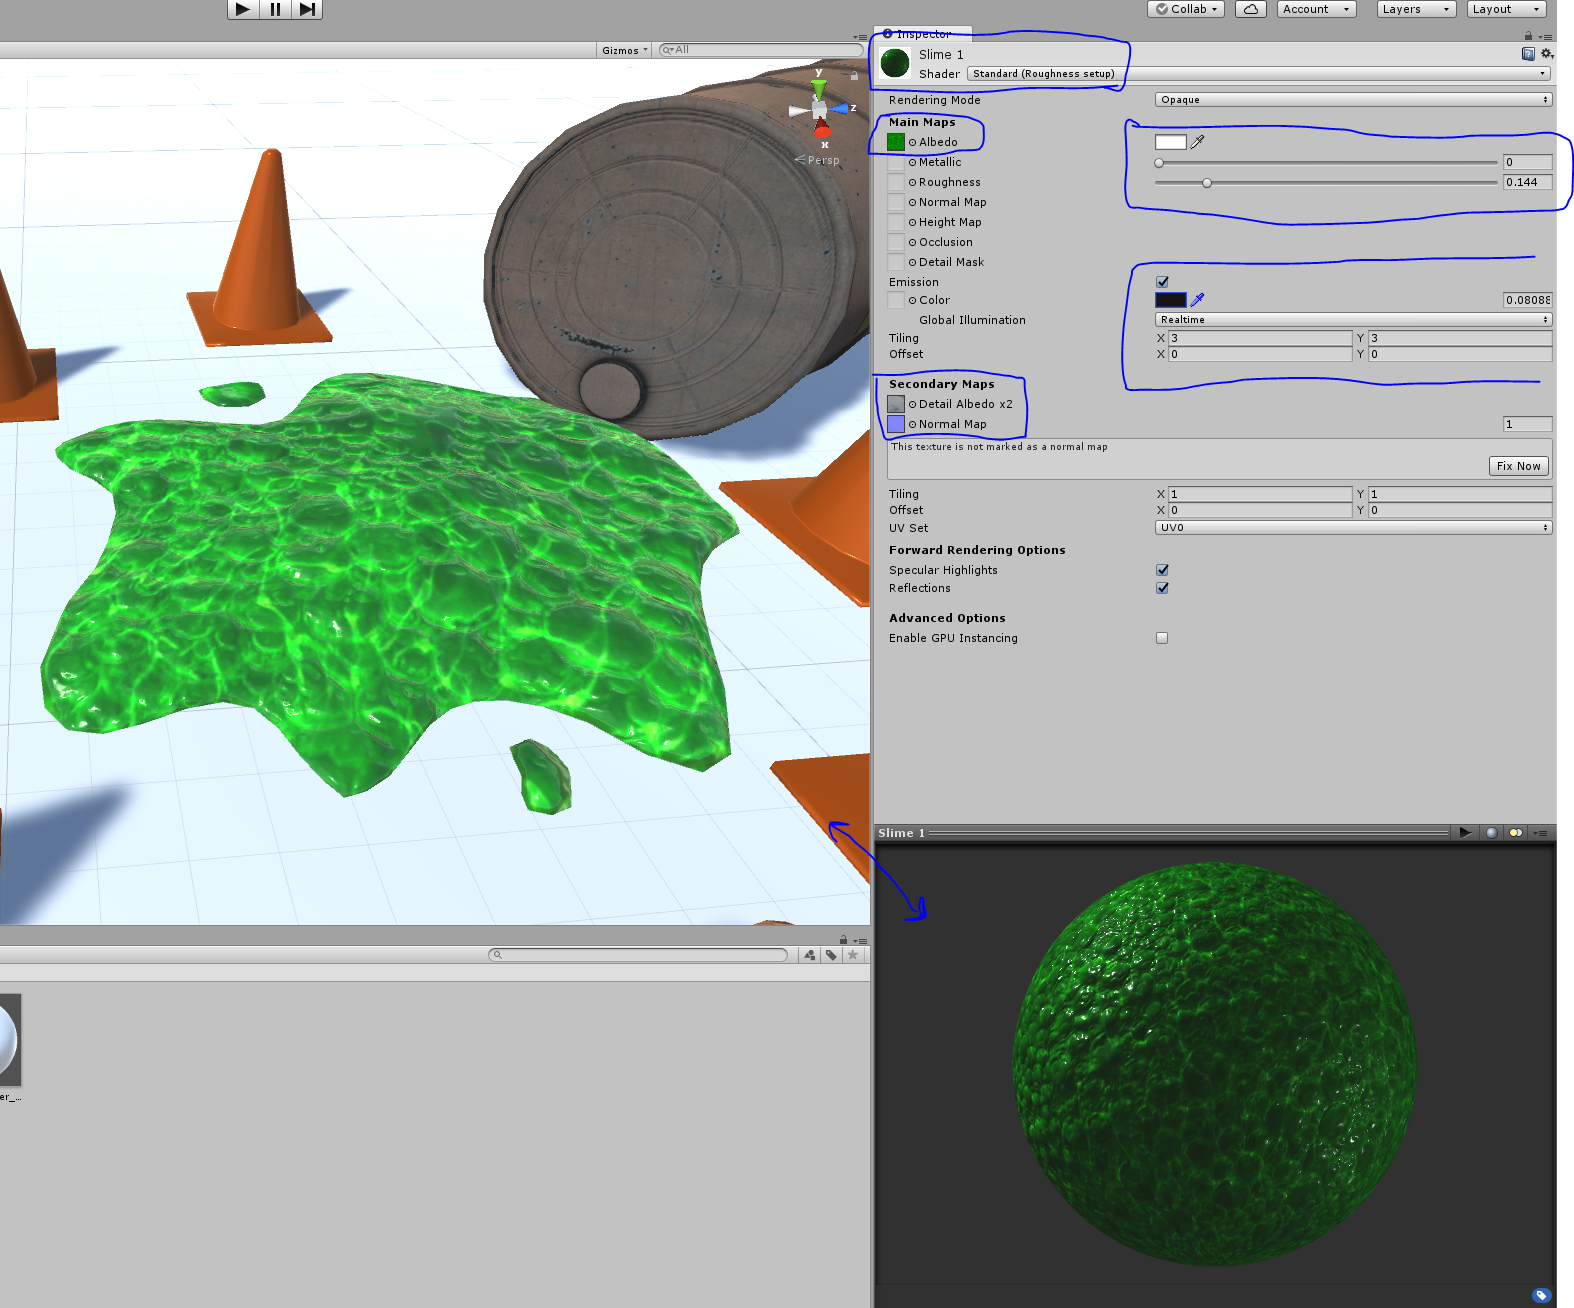
 Advanced custom materials: For the first part I am creating my own scene with what was given first before I make a material. Then after I make the small scene I will make a new material and make it a Standard (Roughness Setup).
 I will be using the given texture and from there I will adjust it to size and also add a second albedo map. More after.
 Next I will make an animation for it.
For Section 5, Prefabs, I will be working on the following:
What are Prefabs?: Just a quick overview of what Prefabs are - A way to reuse elements and it is also another way to rapidly update elements throughout a scene. Multiple prefabs of the same object can also be created and edited differently.
Creating and exporting prefabs: Here I will start creating a blank Game Object to make a prefab. After this I will select the objects I want and drag them into the blank object. From here I can adjust it the way I want after.

after this I will select a folder where I want my prefab to be in and right click select create prefab and that's all.
 Importing prefabs:
No screenshot here because this part works the same way as importing assets.
Prefab instances and updates: For this part I'm not doing much other then knowing how to use prefab's in the scene and the different ways of placing them around. Just editing positions, materials, and such..
In Section 6, Level Building, I will be working on the following:
Placing Modular Assets: Here I will be placing a lot of assets/ level building.
Note if i place prefabs or any assets in the hierarchy it should place them at 0,0,0.
V = Vertex Snap


 Roof and Floor Build:
For this part I added the floor and the roof area that was missing and after that I placed a plane on the scene.
I was not able to use the same floor prefab that was already created in the tutorial so I just used the same ones and made a new prefab without the change of material.

 Props and Scene Assembly: Here I used the preset Prefabs that were included in the tutorial and placed them around the scene so it would not look empty.

For Section 7, Creating and Implementing Animation, I will be working on the following:
Animation Basics and Editors in Unity:
For the first part I will be making a quick animation for the conveyor belt to show that it is moving around.
 Animation Clips and Controllers:
For this part I will be focusing on animating clips and controllers by starting with the conveyor Hatch.
 After I add 3 clips to the hatch it should work well then I will add a Hatch Open Controller. Instead of the Animation Window I am using the Animator Window.
 Video of the final result.
Physics and Rigid Bodies: Now for this part I will be working with Physics and also Rigid Bodies. The Object I will be using is a box and I will be working by the conveyor.
I will add a rigid body to the box mesh. I could leave it like this but there are no collisions so it clips through everything.
Now I will add the rest..such as Physics- Box Colliders. and a mesh collider on the Conveyor Belt.
and after that I added a Zero friction to the conveyor belt so it will slide the box done and not stay at the top and lastly a mesh collider in the bin where it will stay. (End result in video)
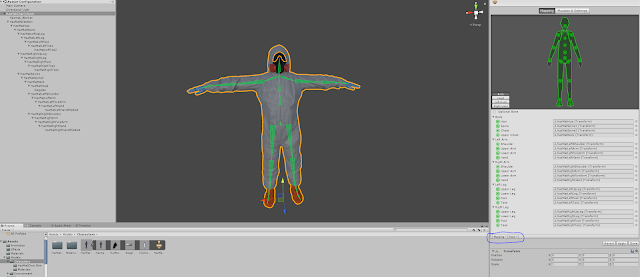
Re-targeting: Third-Person Character: For this part I will be working on getting the 3rd-person character working properly. In the tutorial it told me to use the prefab first then add the pre made character also.
 From here I have to adjust the 3rd person controller so It will work with the hazmat character.

when I changed the rig to humanoid this showed up and I also had to go on the bottom right and change to the Mapping to Automap and the Pose to Enforce T_Pose then apply.
After this is done I can know move around, but I still need to set up a camera [3rd Person Camera]
by doing this I create a new camera under the HazMatChar. I will adjust the cam a bit after.
Scripting and Mono Develop: Here I will see how I can adjust the 3rd person user control script.

Also this is the Script.... all I did here was change a command to do the opposite. by adding a [!] and a [f]

*I created a folder structure in Unity*
*Imported Standard Packages to my folders*
For Section 2, Understanding the Unity Project, I will be working on the following:
**Noting being done in this section**The Ones that are empty do not have any work being done.*
Intro to the Unity user interface:
Customizing the UI:
Navigating Unity*: For this part I am using the Game Object Tab to create multiple objects in the view port and there is also a way to isolate objects just by searching a specific one in the Hierarchy search bar ( There is also one in the view port ).
Unity Documentation:
For Section 3, Working with Assets, I will be working on the following:
Game Objects and asset creation: For this part of the tutorial it is show me how I can create my own Game Object and adding components in that one Game Object.
To start off all I do is go to the Game Object Tab and add Empty. Then from there I will be able to add components in the Inspector Tab.

The Unity Asset Store: *Just a quick overview of the Asset Store in Unity*
Content creation checklist: another overview that talks about what things I should keep in mind when I create a Unity Project.
- Poly Budget
- Snapped to origin * have stuff snapped to 0,0 in Unity so they are on Unity properly.
- Proper UV's for two channels: Textures and Lightmaps
- Textures are (should be) power of 2 (512, 1,024, 2,048)
- Proper Directories: Unity Structure
- Animation: Light, Clean, and Easy to Export
- File Format: Use .fbx
Exporting assets for Unity:
For the first part of the video it just explains the different types of formats Unity can use.
Importing assets into Unity: For this part I am importing assets into unity by right clicking and selecting Import New Asset . From here I am only importing assets that I will be needing.
For Section 4, Applying Materials, I will be working on the following:
Intro to materials: For this part It is talking about the materials (overview) that have been given to us and what they are/ do.


For the first part of the video I am changing the color on the material I made (Picture Above). Also I changed the Shader to Standard (Specular Setup).


For Section 5, Prefabs, I will be working on the following:
What are Prefabs?: Just a quick overview of what Prefabs are - A way to reuse elements and it is also another way to rapidly update elements throughout a scene. Multiple prefabs of the same object can also be created and edited differently.
Creating and exporting prefabs: Here I will start creating a blank Game Object to make a prefab. After this I will select the objects I want and drag them into the blank object. From here I can adjust it the way I want after.

after this I will select a folder where I want my prefab to be in and right click select create prefab and that's all.

No screenshot here because this part works the same way as importing assets.
Prefab instances and updates: For this part I'm not doing much other then knowing how to use prefab's in the scene and the different ways of placing them around. Just editing positions, materials, and such..
In Section 6, Level Building, I will be working on the following:
Placing Modular Assets: Here I will be placing a lot of assets/ level building.
Note if i place prefabs or any assets in the hierarchy it should place them at 0,0,0.
V = Vertex Snap


For this part I added the floor and the roof area that was missing and after that I placed a plane on the scene.
I was not able to use the same floor prefab that was already created in the tutorial so I just used the same ones and made a new prefab without the change of material.


For Section 7, Creating and Implementing Animation, I will be working on the following:
Animation Basics and Editors in Unity:
For the first part I will be making a quick animation for the conveyor belt to show that it is moving around.

For this part I will be focusing on animating clips and controllers by starting with the conveyor Hatch.


Physics and Rigid Bodies: Now for this part I will be working with Physics and also Rigid Bodies. The Object I will be using is a box and I will be working by the conveyor.
I will add a rigid body to the box mesh. I could leave it like this but there are no collisions so it clips through everything.
and after that I added a Zero friction to the conveyor belt so it will slide the box done and not stay at the top and lastly a mesh collider in the bin where it will stay. (End result in video)
Re-targeting: Third-Person Character: For this part I will be working on getting the 3rd-person character working properly. In the tutorial it told me to use the prefab first then add the pre made character also.


After this is done I can know move around, but I still need to set up a camera [3rd Person Camera]
by doing this I create a new camera under the HazMatChar. I will adjust the cam a bit after.
Scripting and Mono Develop: Here I will see how I can adjust the 3rd person user control script.

Also this is the Script.... all I did here was change a command to do the opposite. by adding a [!] and a [f]


Comments
Post a Comment